The Headless UI library is part of @amp-labs/react and provides a powerful foundation for managing connections and installations while giving you complete control over your UI implementation. This library is designed for developers who want to build custom user interfaces while leveraging robust connection, integration, and installation management capabilities.
The Headless UI library is in beta. It may change in non-backwards-compatible ways. (Although we are very serious about semantic versioning.)If you have any feedback, please file an issue on Github.
Overview
The Headless UI Library provides a series of React hooks that manage connections, installations, and other configuration data using query and mutation hooks. The hooks may be used together or independently of the prebuilt UI components.
The Headless UI Library separates the logic of connection and installation management from the UI components, allowing you to:
- Manage connections to various services and platforms.
- Handle installation processes.
- Implement custom UI components.
- Maintain full control over the user experience.
Prerequisites
Install the library
The Headless UI Library is currently in the same package as our prebuilt UI components.
npm install @amp-labs/react
# or
yarn add @amp-labs/react
Context setup
In order for the headless hooks and functions to have relevant context, you can only use them inside AmpersandProvider and InstallationProvider.
The AmpersandProvider needs to wrap all usages of headless hooks and functions as well as prebuilt UI components. See AmpersandProvider for more details on configuration and authentication methods.
The InstallationProvider needs to wrap any code that interacts with a particular installation. This means that if your UI needs to handle multiple installations (e.g., one for Asana and one for Zendesk), then you need two instances of InstallationProvider: one that wraps the code for Asana setup, and one that wraps the code for Zendesk setup.
InstallationProvider requires the following props:
- integration (string): the name of an integration that you’ve defined in
amp.yaml.
- consumerRef (string): the ID that your app uses to identify this end user.
- consumerName (string, optional): the display name for this end user.
- groupRef (string): the ID that your app uses to identify a company, team, or workspace. See group.
- groupName (string, optional): the display name for this group.
import {
AmpersandProvider, // Needed for all hooks and components in @amp-labs/react.
InstallationProvider, // Needed for headless hooks and functions.
} from "@amp-labs/react"
const options = {
project: 'PROJECT', // Your Ampersand project name or ID
// Pick one of the following authentication methods.
apiKey: 'API_KEY', // Ampersand API key (simple)
// OR
getToken: async ({consumerRef, groupRef}) => { // JWT Authentication (advanced)
// Custom logic to fetch JWT token from your backend, e.g.
return await getTokenFromMyBackend(consumerRef, groupRef);
// See https://docs.withampersand.com/api/jwt-auth
},
};
// Define variables that will be used for this code snippet and
// other code snippets on this page.
const integration = "my-salesforce-integration"; // Must match name in `amp.yaml`.
const provider = "salesforce";
const groupRef = "group-test-1";
const groupName = "Test Group";
const consumerRef = "consumer-test-1";
const consumerName = "Test Consumer";
function App() {
return (
<AmpersandProvider options={options}>
<InstallationProvider
integration={integration}
groupRef={groupRef}
groupName={groupName}
consumerRef={consumerRef}
consumerName={consumerName}
>
{/* Your custom component */}
<MyComponent />
</InstallationProvider>
</AmpersandProvider>
);
}
Connection management
The library provides hooks and utilities for managing Connections.
The useConnection hook provides access to the current connection state and management functions. It returns an object with the following properties:
connection: The current Connection object, or null if there isn’t one.
error: Any error that occurred while fetching the Connection.
isPending: If true, there is no data yet.
isFetching: If true, the data is being fetched (including refetches).
isError: If true, an error occurred while fetching the connection.
isSuccess: If true, the last fetch was successful.
import { useConnection, ConnectProvider } from '@amp-labs/react';
function MyComponent() {
const {
connection, // Connection object
error,
isPending,
isFetching,
isError,
isSuccess,
} = useConnection();
// Use these values to build your custom UI
return (
<div>
{connection ? (
{/* If there isn't a Connection, show prebuilt ConnectProvider component. */}
<ConnectProvider
provider={provider}
consumerRef={consumerRef}
groupRef={groupRef}
onConnectSuccess={(connection) => {
console.log("Connection successful:", connection);
}}
onDisconnectSuccess={(connection) => {
console.log("Disconnection successful:", connection);
}}
/>
) : (
{/* If user is already connected, guide them through the rest of the configuration. */}
<MyConfigurationComponent/>
)}
</div>
);
}
Installation management
Get current installation
The useInstallation hook provides access to the current installation state and management functions. It returns an object with the following properties:
installation: The current Installation object, or null if not installed.
error: Any error that occurred while fetching the Installation.
isPending: If true, there is no data yet.
isFetching: If true, the data is being fetched (including refetches).
isError: If true, an error occurred while fetching the connection.
isSuccess: If true, the last fetch was successful.
import { useInstallation } from '@amp-labs/react';
function InstallationComponent() {
const { installation } = useInstallation();
return (
<div>
{installation ? (
<div>You've successfully installed the integration!</div>
) : (
<MyInstallationComponent/>
)}
</div>
);
}
Get config from existing installation
To access the configuration from an existing installation, you can use the installation.config property. See API reference for more details:
import { useInstallation } from '@amp-labs/react';
function ConfigDisplayComponent() {
const { installation } = useInstallation();
if (!installation) {
return <div>No installation found</div>;
}
// Access the configuration from the installation
const config = installation.config;
// Use the config to build your custom UI
}
For more advanced config management: including getting/setting read/write objects in the config and managing a local draft copy, use the useLocalConfig() hook.
Create, update, and delete installations
The following hooks provide granular control over Installation operations:
useCreateInstallation
useUpdateInstallation
useDeleteInstallation
For example, the useCreateInstallation hook is used to create a new Installation.
As of v2.12.1, useCreateInstallation automatically populates config.provider from the integration object if it is not explicitly set in the config. This means you no longer need to manually set the provider.
It returns the following:
createInstallation: a tanstack-query mutation function to create a new Installation. Its signature is:
(params: {
config: InstallationConfigContent;
onSuccess?: (data: Installation) => void;
onError?: (error: Error) => void;
onSettled?: () => void;
}) => void;
isPending: Boolean indicating if creation is in progress.
error: Any error that occurred during creation.
errorMsg: String message describing the error.
isIdle: If true, createInstallation has not been called yet.
isSuccess: If true, installation was successfully created.
useUpdateInstallation and useDeleteInstallation follow similar conventions.
Here’s an example of how you can use these hooks:
import { useCreateInstallation } from '@amp-labs/react';
function InstallationForm() {
const {
createInstallation,
isPending,
error,
errorMsg,
} = useCreateInstallation();
const handleSubmit = async (e) => {
e.preventDefault();
createInstallation({
// Add your installation config here
config: {
read: {
objects: {
companies: {
objectName: 'companies',
selectedFieldsAuto: 'all', // Read all fields
},
},
},
},
onSuccess: (data) => {
console.log("Installation created", { installation: data });
},
onError: (error) => {
console.error("Installation creation failed", { error });
},
});
};
return (
<form onSubmit={handleSubmit}>
<button
type="submit"
disabled={isPending}
>
{isPending ? 'Creating...' : 'Create Installation'}
</button>
{error && <div className="error">{errorMsg}</div>}
</form>
);
}
The useManifest hook provides the data that you need to build input forms for your users to help them configure the integration. This hook allows you to:
- Access integrations as defined in the manifest (
amp.yaml).
- Retrieve object and field metadata from the connected provider (e.g., Salesforce, Hubspot). This allows your application to know about the exact objects and fields that exist in your customer’s SaaS instance, including custom objects and fields. With this information, you can build dropdowns, checkboxes, etc.
For now, you can only access your manifest’s Read Actions. Please note that you still create an Installation with Subscribe and Write Actions using useCreateInstallation. For write actions, you can also use useConfig to construct the config object, see Manage write config.
import { useManifest } from "@amp-labs/react";
const {
getReadObjects: () => HydratedIntegrationObject[], // Get all read objects from manifest (v2.12.1+)
getReadObject: (objectName: string) => {
object: HydratedIntegrationObject | null;
getRequiredFields: () => HydratedIntegrationField[] | null;
getOptionalFields: () => HydratedIntegrationField[] | null;
},
getCustomerFieldsForObject: (objectName: string) => {
// Map of field names to field metadata.
allFields: { [field: string]: FieldMetadata } | null;
// Get a specific field's metadata.
getField: (field: string) => FieldMetadata | null;
},
data: HydratedRevision | undefined,
isPending: boolean,
isFetching: boolean,
isError: boolean,
isSuccess: boolean,
error: Error | null,
} = useManifest();
Get fields from customer’s SaaS
The getCustomerFieldsForObject function returned by useManifest allows you to retrieve the standard and custom fields that exist in your customer’s SaaS instance for a particular object.
const { getCustomerFieldsForObject } = useManifest();
// Get all the fields that exist on the customer's Account object,
// including standard and custom fields.
const fields = getCustomerFieldsForObject("account");
// This is a map of field names to field metadata,
const allFields = fields?.allFields;
// Convert to array if you want to show all of them in a list.
const allFieldsArray = allFields ? Object.values(allFields) : [];
The fields mapping page of the demo app provides a full example for using useManifest to build the UI for customers to configure the installation.
Get all read objects from manifest
The getReadObjects function returned by useManifest returns all read objects defined in the manifest, which is useful when you need to iterate over all objects rather than fetching them individually by name. Supported in @amp-labs/react v2.12.1+.
const { getReadObjects } = useManifest();
const allReadObjects = getReadObjects(); // HydratedIntegrationObject[]
allReadObjects.forEach((obj) => {
console.log(obj.objectName);
});
Local config management
Managing the Config that keeps track of each customer’s preference for how the integration behaves can be complex, with deeply nested objects and the need to manage this state locally.
The useLocalConfig hook simplifies local state management of the config object by providing flexible utilities to manipulate the config through a set of setters and getters. It maintains a draft state, which you can modify before committing changes to the installation.
Deprecated: useConfig has been deprecated in v2.9.0. It has been renamed to useLocalConfig() without any other changes.For fetching an existing config from an installation, use useInstallation which provides access to the current installation’s configuration.
It returns these fields:
// Return values of `useLocalConfig` hook.
{
draft: InstallationConfigContent; // Current draft configuration
get: () => InstallationConfigContent; // Get current configuration
reset: () => void; // Reset to installation's current config
setDraft: (config: InstallationConfigContent) => void; // Update draft config
removeObject: (objectName: string) => void; // Remove object from all actions (v2.12.1+)
readObject: (objectName: string) => ReadObjectHandlers; // Manage read object config
writeObject: (objectName: string) => WriteObjectHandlers; // Manage write object config
}
// Shape of ReadObjectHandlers (returned by `readObject` function above).
{
object: BaseReadConfigObject | undefined; // Current read object configuration
setEnableRead: () => void; // Enable reading for object, initializes with defaults (v2.12.1+)
setDisableRead: () => void; // Disable reading for object (v2.12.1+)
getSelectedField: (fieldName: string) => boolean; // Check if field is selected
setSelectedField: (params: { fieldName: string; selected: boolean }) => void; // Toggle field selection
getFieldMapping: (fieldName: string) => string | undefined; // Get field mapping
setFieldMapping: (params: { fieldName: string; mapToName: string }) => void; // Set field mapping
deleteFieldMapping: (mapToName: string) => void; // Delete field mapping
}
// Shape of WriteObjectHandlers (returned by `writeObject` function above).
{
object: BaseWriteConfigObject | undefined; // Current write object configuration
setEnableWrite: () => void; // Enable write for object
setDisableWrite: () => void; // Disable write for object
setEnableDeletion: () => void; // Enable deletion for object
setDisableDeletion: () => void; // Disable deletion for object
getWriteObject: () => BaseWriteConfigObject | undefined; // Get write object config
// advanced write features
// https://docs.withampersand.com/write-actions#advanced-use-cases
getDefaultValues: (fieldName: string) => FieldSettingDefault | undefined;
setDefaultValues: (params: {
fieldName: string;
value: FieldSettingDefault;
}) => void;
getWriteOnCreateSetting: (
fieldName: string,
) => FieldSettingWriteOnCreateEnum | undefined;
setWriteOnCreateSetting: (params: {
fieldName: string;
value: FieldSettingWriteOnCreateEnum;
}) => void;
getWriteOnUpdateSetting: (
fieldName: string,
) => FieldSettingWriteOnUpdateEnum | undefined;
setWriteOnUpdateSetting: (params: {
fieldName: string;
value: FieldSettingWriteOnUpdateEnum;
}) => void;
getSelectedFieldSettings: (fieldName: string) => FieldSetting | undefined;
setSelectedFieldSettings: (params: {
fieldName: string;
settings: FieldSetting;
}) => void;
}
Basic example
This is a basic example that hard-codes a Config and does not allow the user to modify it.
function ConfigManager() {
const config = useLocalConfig();
const { createInstallation } = useCreateInstallation();
config.setDraft({
provider: "salesforce",
read: {
objects: {
contact: {
objectName: "contact",
selectedFields: {
"name": true,
"email": true
},
selectedFieldsMappings: {
// Mapping from billingaddress (in SaaS API) to address (in your application).
"address": "billingaddress"
}
}
}
}
});
const handleSave = async () => {
await createInstallation({
config: config.get(),
});
};
return (<button onClick={handleSave}>Create installation</button>)
}
Manage read config
This is an example for how to use helper functions to more easily construct a read config, so you do not have to create the full config object manually.
function ReadObjectConfig() {
const config = useLocalConfig();
const { createInstallation } = useCreateInstallation();
const contactConfig = config.readObject("contact");
// Check if field is already selected in local config
const isNameSelected = contactConfig.getSelectedField("name");
// Select a field
contactConfig.setSelectedField({ fieldName: "email", selected: true });
// Get existing mapping for a field in local config
const mappedField = contactConfig.getFieldMapping("email_address");
// Set field mapping
contactConfig.setFieldMapping({
fieldName: "email", // raw field from provider API
mapToName: "email_address" // mapped field
});
// Create an installation with the current config
const handleSave = async () => {
await createInstallation({
config: config.get(),
});
};
}
Enable, disable, and remove read objects
The readObject() handlers include setEnableRead and setDisableRead to control whether an object is read. removeObject fully deletes an object from the config. Supported in @amp-labs/react v2.12.1+.
setEnableRead — initializes a read object in the draft config and enables it. Safe to call multiple times (idempotent). For convenience, you can skip calling this function if you are already calling setFieldMapping or setSelectedField.
setDisableRead — pauses reads for the object without removing its config (sets a disabled flag).
removeObject — fully deletes an object from all actions (both read and write) in the draft config.
Calling setSelectedField or setFieldMapping will also automatically enable the read object, so setEnableRead is primarily useful when you want to enable an object without configuring fields, or to re-enable an object that was previously disabled.
function ObjectManager() {
const config = useLocalConfig();
const { createInstallation } = useCreateInstallation();
// Enable reading for the "contact" and "account" objects
config.readObject("contact").setEnableRead();
config.readObject("account").setEnableRead();
// Pause reads for "account" (keeps its config intact)
config.readObject("account").setDisableRead();
// Or fully remove "account" from both read and write config
config.removeObject("account");
const handleSave = async () => {
await createInstallation({
config: config.get(),
});
};
return (<button onClick={handleSave}>Create installation</button>)
}
Manage write config
The headless UI library provides helper functions to more easily construct a write config. Here’s a simple example that enables a particular object to be written to:
function WriteObjectConfig() {
const { createInstallation } = useCreateInstallation();
const config = useLocalConfig();
const contactWriteConfig = config.writeObject("contact");
// Enable write for Contact object
contactWriteConfig.setEnableWrite();
// Create an installation with the current config
const handleSave = async () => {
await createInstallation({
config: config.get(),
});
};
}
You can also configure advanced write use cases, which include the ability to:
- Set default values for certain fields.
- Prevent overwriting of existing customer data.
You can configure write settings for individual features using these methods:
function WriteObjectConfig() {
const config = useLocalConfig();
const { createInstallation } = useCreateInstallation();
const contactWriteConfig = config.writeObject("contact");
// Set default value for a field
contactWriteConfig.setDefaultValues({
fieldName: "source",
value: {
stringValue: "myApp" // String default
}
});
contactWriteConfig.setDefaultValues({
fieldName: "amount",
value: {
integerValue: 0 // Number default
}
});
contactWriteConfig.setDefaultValues({
fieldName: "automated",
value: {
booleanValue: true // Boolean default
}
});
// Configure which fields should be written to during create operations
contactWriteConfig.setWriteOnCreateSetting({
fieldName: "source",
value: "always" // Always write source field on create
});
contactWriteConfig.setWriteOnCreateSetting({
fieldName: "notes",
value: "never" // Never write notes field on create
});
// Configure which fields should be written to during update operations
contactWriteConfig.setWriteOnUpdateSetting({
fieldName: "source",
value: "never" // Never write source field on update
});
contactWriteConfig.setWriteOnUpdateSetting({
fieldName: "notes",
value: "always" // Always write notes field on update
});
// Get current local settings
const defaultValues = contactWriteConfig.getDefaultValues("source");
const writeOnCreate = contactWriteConfig.getWriteOnCreateSetting("source");
const writeOnUpdate = contactWriteConfig.getWriteOnUpdateSetting("source");
// Create an installation with the current config
const handleSave = async () => {
await createInstallation({
config: config.get(),
});
};
}
You can use setFieldSettings to set all advanced write features at once for a field:
function WriteObjectConfig() {
const config = useLocalConfig();
const { createInstallation } = useCreateInstallation();
const contactWriteConfig = config.writeObject("contact");
// Configure a field with both write behavior and default value
contactWriteConfig.setFieldSettings({
fieldName: "customSource",
settings: {
writeOnCreate: "always", // Write on create
writeOnUpdate: "never", // Don't write on update
default: {
stringValue: "myApp" // Default value
}
}
});
// Get current settings
const current = contactWriteConfig.getFieldSettings("customSource");
// Create an installation with the current config
const handleSave = async () => {
await createInstallation({
config: config.get(),
});
};
}
Examples
Demo app
View the source code on GitHub
The headless demo app uses a Salesforce integration, and includes:
- Ability to map fields; the dropdown is populated with standard and optional fields from the connected Salesforce instance.
- Ability to create and update an Installation with the “Install” button.
- Ability to reset Config to previous state with the “Reset” button.
- Ability to delete an Installation with the “Delete” button.
- Usage of Shadcn UI components + Tailwind CSS to demonstrate how you can bring your own design system.
It uses the following headless hooks:
Demo app with write config
View the source code on GitHub
The headless write demo app uses a Salesforce integration, and extends the basic demo app with:
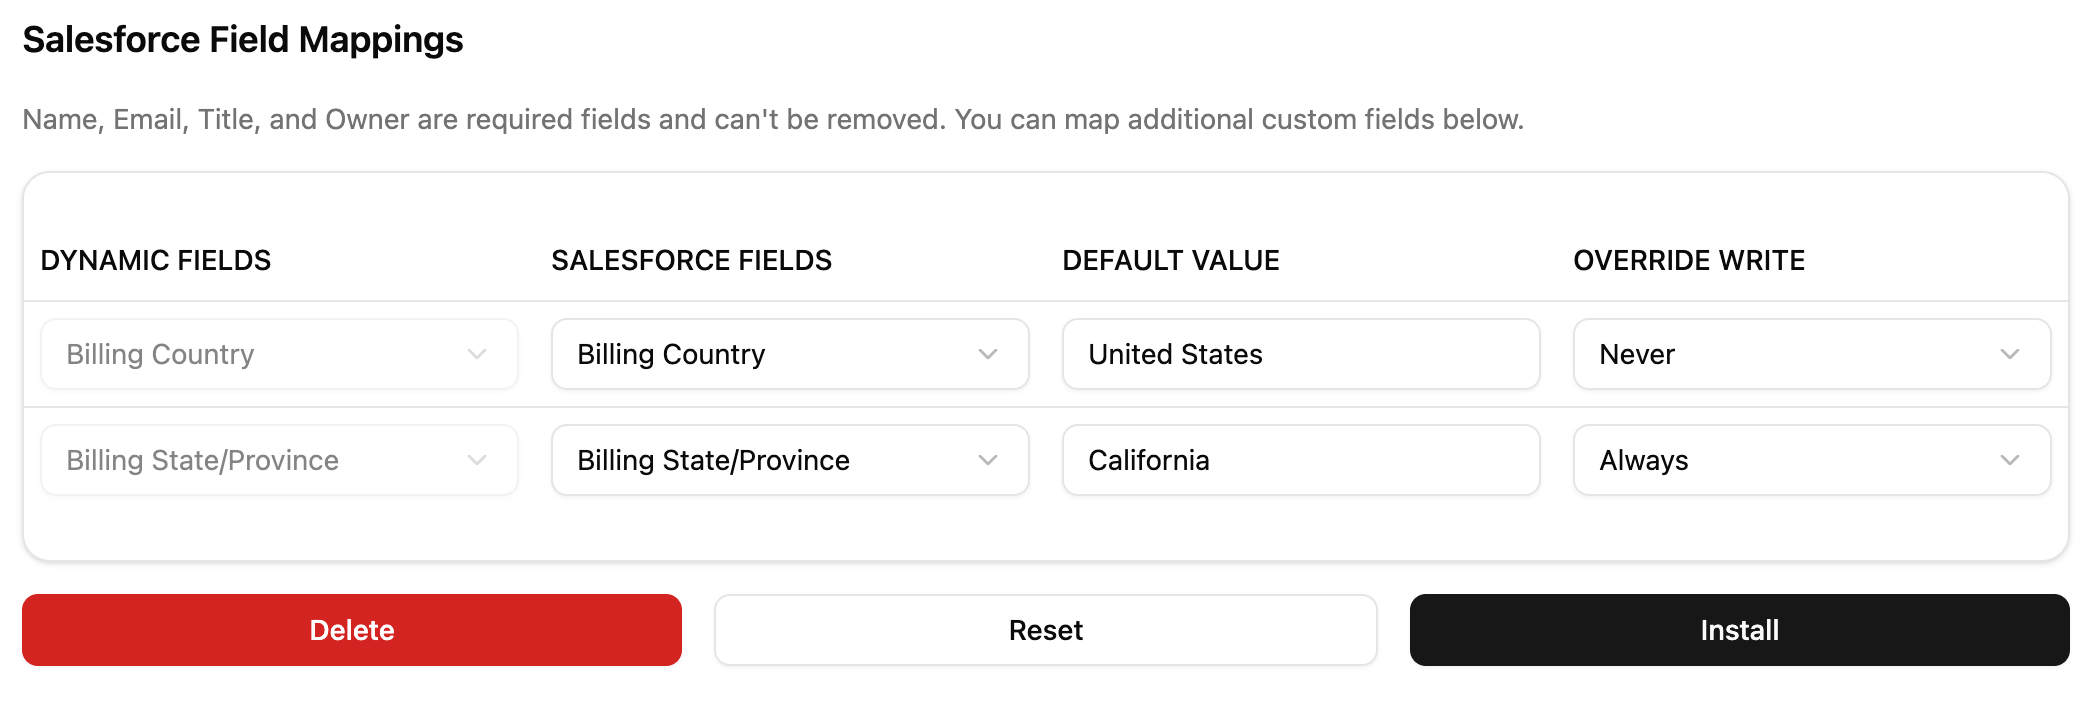
- Ability to set default values for fields when writing.
- Ability to prevent overwriting of customer data.
Pre-defined configuration flow
If you do not want your users to be able to modify or configure the installation, you can build a pre-defined configuration flow using the code snippet below. This is helpful if you do not want your user to be able to modify which objects and fields your integration reads and writes, and you do not need them to do any field mappings.
import {
AmpersandProvider, ConnectProvider, useConnection, useInstallation,
} from '@amp-labs/react';
import { ConfigContent, AmpersandProviderOptions } from '@amp-labs/react/types';
const projectOptions: AmpersandProviderOptions ={
apiKey: 'my-api-key',
project: 'my-project',
}
const installationParams = {
integration: 'my-hubspot-integration',
consumerRef: 'user-123',
groupRef: 'company-456',
};
export function App() {
// Wrap your custom component inside of AmpersandProvider and InstallationProvider
return (
<AmpersandProvider options={projectOptions}>
<InstallationProvider
integration={installationParams.integration}
consumerRef={installationParams.consumerRef}
groupRef={installationParams.groupRef}
>
<MyIntegrationComponent />
</InstallationProvider>
</AmpersandProvider>
);
}
// Static content for the installation, no user input needed
const myConfig: ConfigContent = {
read: {
objects: {
companies: {
objectName: 'companies',
// Auto-select all fields to be read,
// alternatively you can specify any desired fields & mappings here.
selectedFieldsAuto: 'all',
},
}
};
function MyIntegrationComponent() {
const {
installation,
isPending: isInstallationPending, // No data yet
isFetching: isInstallationFetching, // Data is being refreshed
isError: isInstallationError,
error: installationError,
} = useInstallation();
const {
connection,
isPending: isConnectionPending, // No data yet
isFetching: isConnectionFetching, // Data is being refreshed
isError: isConnectionError,
error: connectionError,
} = useConnection();
// Custom connection loading, error, and installation state overrides
if (isConnectionPending || isInstallationPending) return <div>Loading </div>;
if (isConnectionError) return <div>Error loading connection: {connectionError.message}</div>;
if (isInstallationError) return <div>Error loading installation: {installationError.message}</div>;
// The installation already exists
if (!!installation) { return (<MyManageInstallationComponent />) }
if (connection) {
createInstallation({ config: myConfig });
};
// Use Ampersand's built in UI for the Connection flow
// This is the same as the existing ConnectProvider component but parameters
// can be ommited since we are inside of InstallationProvider
// When the connection is successful, this component will re-render since
// `useConnection` will return the new connection.
return (
<ConnectProvider
consumerRef={installationParams.consumerRef}
groupRef={installationParams.groupRef}
/>
);
}