> ## Documentation Index
> Fetch the complete documentation index at: https://docs.withampersand.com/llms.txt
> Use this file to discover all available pages before exploring further.

# Attio

## What's Supported

### Supported Actions

This connector supports:

* [Read Actions](/read-actions), including full historic backfill and incremental read.
* [Write Actions](/write-actions).
* [Subscribe Actions](/subscribe-actions). Ampersand creates and manages the Attio webhook subscription on your behalf when the customer installs your integration — no manual webhook setup is required in the Attio UI.
* [Proxy Actions](/proxy-actions), using the base URL `https://api.attio.com`.

### Supported Objects

The Attio connector supports the following objects:

export const rows = [{
  label: "People",
  href: "https://docs.attio.com/rest-api/endpoint-reference/standard-objects/people/list-person-records",
  read: true,
  write: true,
  subscribe: true
}, {
  label: "Companies",
  href: "https://docs.attio.com/rest-api/endpoint-reference/standard-objects/companies/list-company-records",
  read: true,
  write: true,
  subscribe: true
}, {
  label: "Users",
  href: "https://docs.attio.com/rest-api/endpoint-reference/standard-objects/users/list-user-records",
  read: true,
  write: true,
  subscribe: true
}, {
  label: "Deals",
  href: "https://docs.attio.com/rest-api/endpoint-reference/standard-objects/deals/assert-a-deal-record",
  read: true,
  write: true,
  subscribe: true
}, {
  label: "Workspaces",
  href: "https://docs.attio.com/rest-api/endpoint-reference/standard-objects/workspaces/assert-a-workspace-record",
  read: true,
  write: true,
  subscribe: true
}, {
  label: "Lists",
  href: "https://docs.attio.com/rest-api/endpoint-reference/lists/list-all-lists",
  read: true,
  write: true,
  subscribe: true
}, {
  label: "WorkspaceMembers",
  href: "https://docs.attio.com/rest-api/endpoint-reference/workspace-members/list-workspace-members",
  read: true,
  write: true,
  subscribe: "create only"
}, {
  label: "Notes",
  href: "https://docs.attio.com/rest-api/endpoint-reference/notes/list-notes",
  read: true,
  write: true,
  subscribe: true
}, {
  label: "Tasks",
  href: "https://docs.attio.com/rest-api/endpoint-reference/tasks/list-tasks",
  read: true,
  write: true,
  subscribe: true
}, {
  label: "Custom objects",
  href: "https://docs.attio.com/rest-api/endpoint-reference/records/list-records",
  read: true,
  write: true,
  subscribe: true
}];

export const Check = () => <span>✅</span>;
export const Cross = () => <span>🚫</span>;
export const Partial = ({label}) => <span title={label}>✅*</span>;

<div style={{width: '100%', overflowX: 'auto', display: 'block'}}>
  <table
    style={{
width: '100%',
minWidth: '100%',
tableLayout: 'fixed',
textAlign: 'center',
borderCollapse: 'collapse',
display: 'table'
}}
  >
    <thead style={{display: 'table-header-group', width: '100%'}}>
      <tr style={{display: 'table-row', width: '100%'}}>
        <th style={{textAlign: 'left', width: '40%'}}>Object</th>
        <th style={{width: '20%'}}>Read</th>
        <th style={{width: '20%'}}>Write</th>
        <th style={{width: '20%'}}>Subscribe</th>
      </tr>
    </thead>

    <tbody style={{display: 'table-row-group', width: '100%'}}>
      {rows.map((row) => (
                <tr id={("row/" + row.label).replace(/\s+/g, '-').toLowerCase()} key={row.label}>
                  <td style={{textAlign: "left"}}><a href={row.href}>{row.label}</a></td>
                  <td>{row.read ? <Check/> : <Cross/>}</td>
                  <td>{row.write ? <Check/> : <Cross/>}</td>
                  <td>{row.subscribe === true ? <Check/> : row.subscribe ? <Partial label={row.subscribe}/> : <Cross/>}</td>
                </tr>
              ))}
    </tbody>
  </table>
</div>

\* WorkspaceMembers only supports **create** events for subscriptions.

### Subscribe events

Attio uses two subscription patterns depending on the object:

* **Standard and custom objects** (People, Companies, Users, Deals, Workspaces, and any custom object) are subscribed through Attio's generic record events (`record.created`, `record.updated`, `record.deleted`), scoped to the specific object. They support **create**, **update**, and **delete** events.
* **Core objects** are subscribed through object-specific events: **Notes**, **Tasks**, and **Lists** support **create**, **update**, and **delete**; **WorkspaceMembers** supports **create** only. Note that **Lists** events fire on the list object itself (a list being created, updated, or deleted) — not on records being added to or removed from a list.

Please note that:

* **Standard objects must be activated.** Attio delivers `record.*` events only for objects that are active in the workspace. People, Companies, and Deals are active by default; Users and Workspaces are optional standard objects that must be enabled under **Workspace settings → Objects** before they can be subscribed to.
* **Watched fields are not supported.** Attio webhook payloads do not include changed-field data, so field-level update filtering (`requiredWatchFields`) is not available. Use `watchFieldsAuto: all` for update events — they fire on any change to the record, and Ampersand fetches the full updated record for you.
* **Scopes gate webhook creation and delivery.** Your Attio app must be granted **read-write access to the Webhooks scope** (to create the subscription) and **read access to record objects** (so Ampersand can fetch the changed record). Grant these under **Workspace settings → Developers → \[your app] → Scopes**; without them, subscription creation fails with a `403`.

For example:

```yaml theme={null}
subscribe:
  objects:
    - objectName: people
      destination: attioWebhook
      inheritFieldsAndMapping: true
      createEvent:
        enabled: always
      updateEvent:
        enabled: always
        watchFieldsAuto: all
      deleteEvent:
        enabled: always
    - objectName: notes
      destination: attioWebhook
      inheritFieldsAndMapping: true
      createEvent:
        enabled: always
```

### Example integration

For an example manifest file of an Attio integration, visit our [samples repo on Github](https://github.com/amp-labs/samples/blob/main/attio/amp.yaml).

## Before You Get Started

To connect Attio with Ampersand, you will need [an Attio Account](https://app.attio.com/auth/sign-in).

Once your account is created, you'll need to create an app in Attio and obtain the following credentials from your app:

* Client ID
* Client Secret

You will then use these credentials to connect your application to Ampersand.

### Create an Attio Account

Here's how you can sign up for an Attio account:

* Go to the [Attio Sign Up page](https://app.attio.com/auth/sign-in).
* Sign up using your preferred method.

### Creating an Attio App

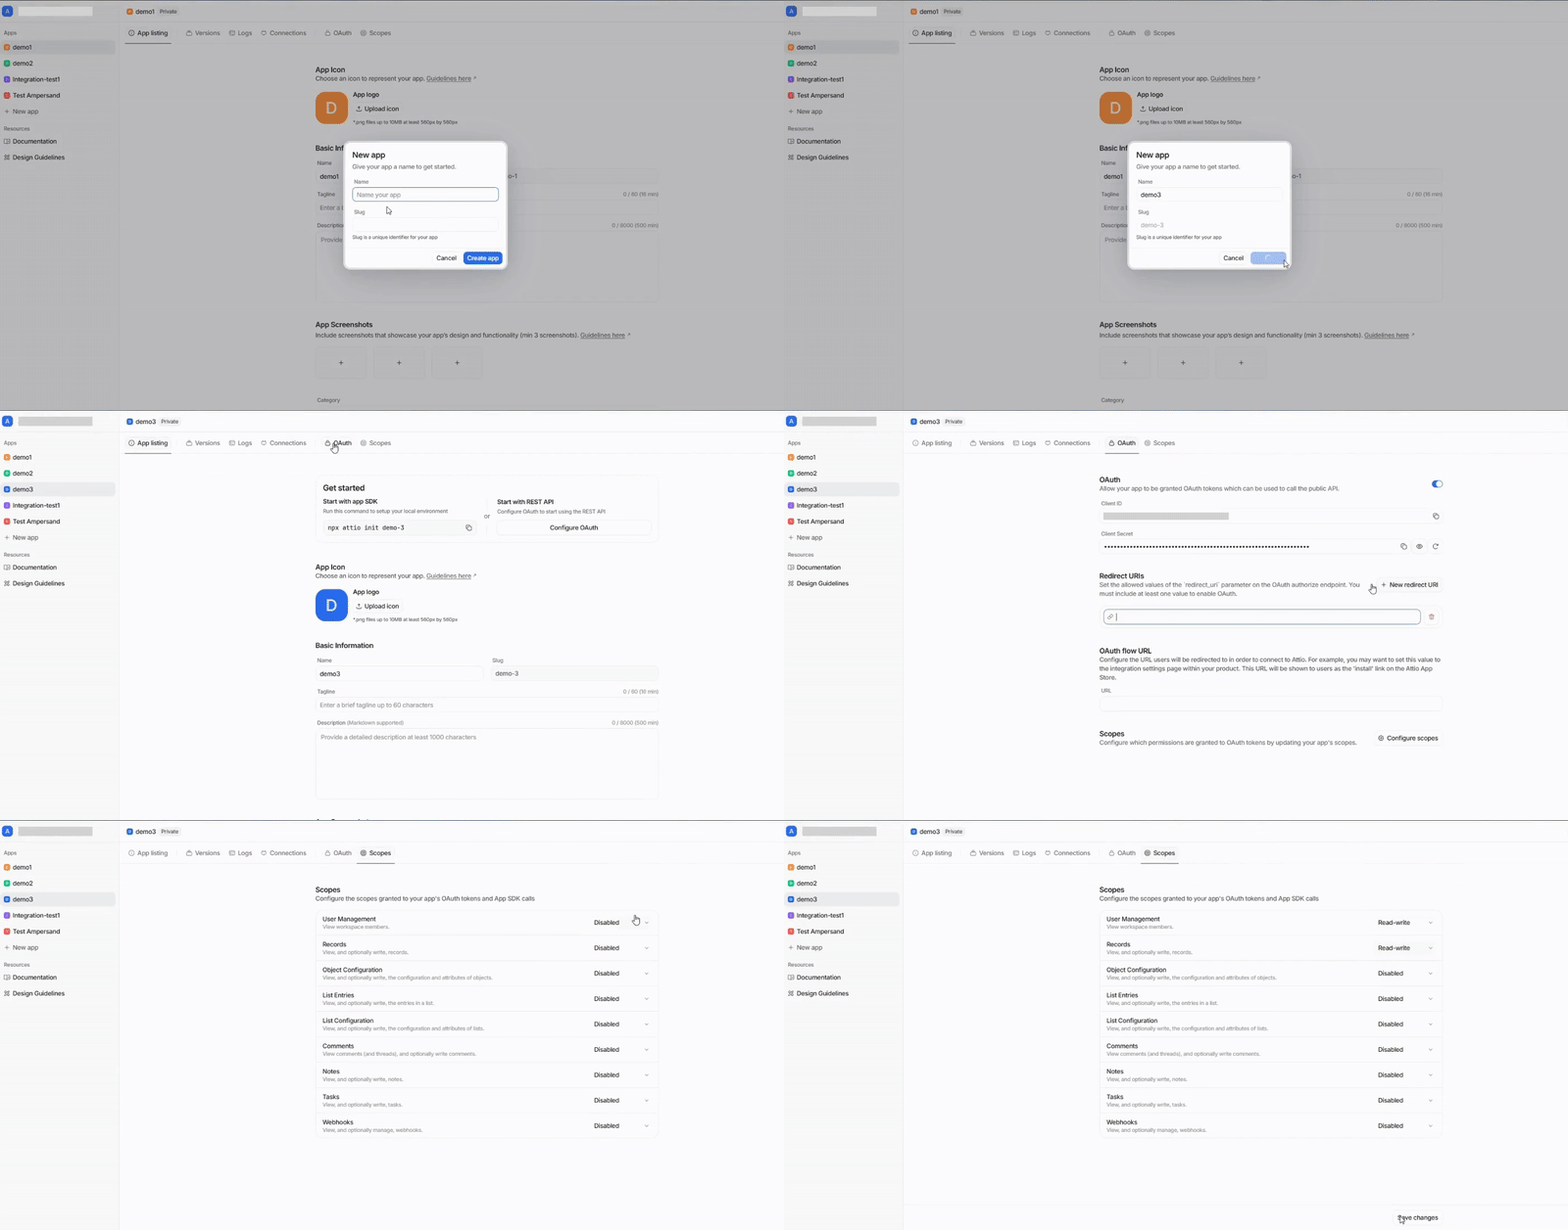
Follow the steps below to create an Attio app and add the Ampersand redirect URL.

1. Log in to your [Attio](https://build.attio.com/auth/login) account.

2. Click on **New app** to open the **New app** dialog.

3. Enter a name for the application in the **name** section and click **Create app**.

4. Navigate to the **OAuth** section and enable **OAuth** switch to view the Client ID and Client Secret.

5. In the **Redirect URIs** section, click **New redirect URI**, add the Ampersand Redirect URI: `https://api.withampersand.com/callbacks/v1/oauth`.

6. Click **Configure scopes**, enable the necessary scopes, and click Save changes.

<img src="https://mintcdn.com/ampersand-24eb5c1a/i4a56x-Fmj6u7jdE/images/provider-guides/attio_oauth.gif?s=9b914e574a924b8fd469d65a56621973" alt="Attio App Creation" width="800" height="419" data-path="images/provider-guides/attio_oauth.gif" />

## Add Your Attio App Info to Ampersand

1. Log in to your [Ampersand Dashboard](https://dashboard.withampersand.com).

2. Select the project where you want to create an Attio integration.

   <img src="https://mintcdn.com/ampersand-24eb5c1a/Bx3tggG51e0liOp-/images/provider-guides/31a6a12-Ampersand.png?fit=max&auto=format&n=Bx3tggG51e0liOp-&q=85&s=7ebd893fd2a976ebe7cf8af53f8581b8" alt="Ampersand Project Selection" width="2244" height="442" data-path="images/provider-guides/31a6a12-Ampersand.png" />

3. Select **Provider Apps**.

4. Select *Attio* from the **Provider** list.

5. Enter the previously obtained *Client ID* in the **Client ID** field and the *Client Secret* in the **Client Secret** field.
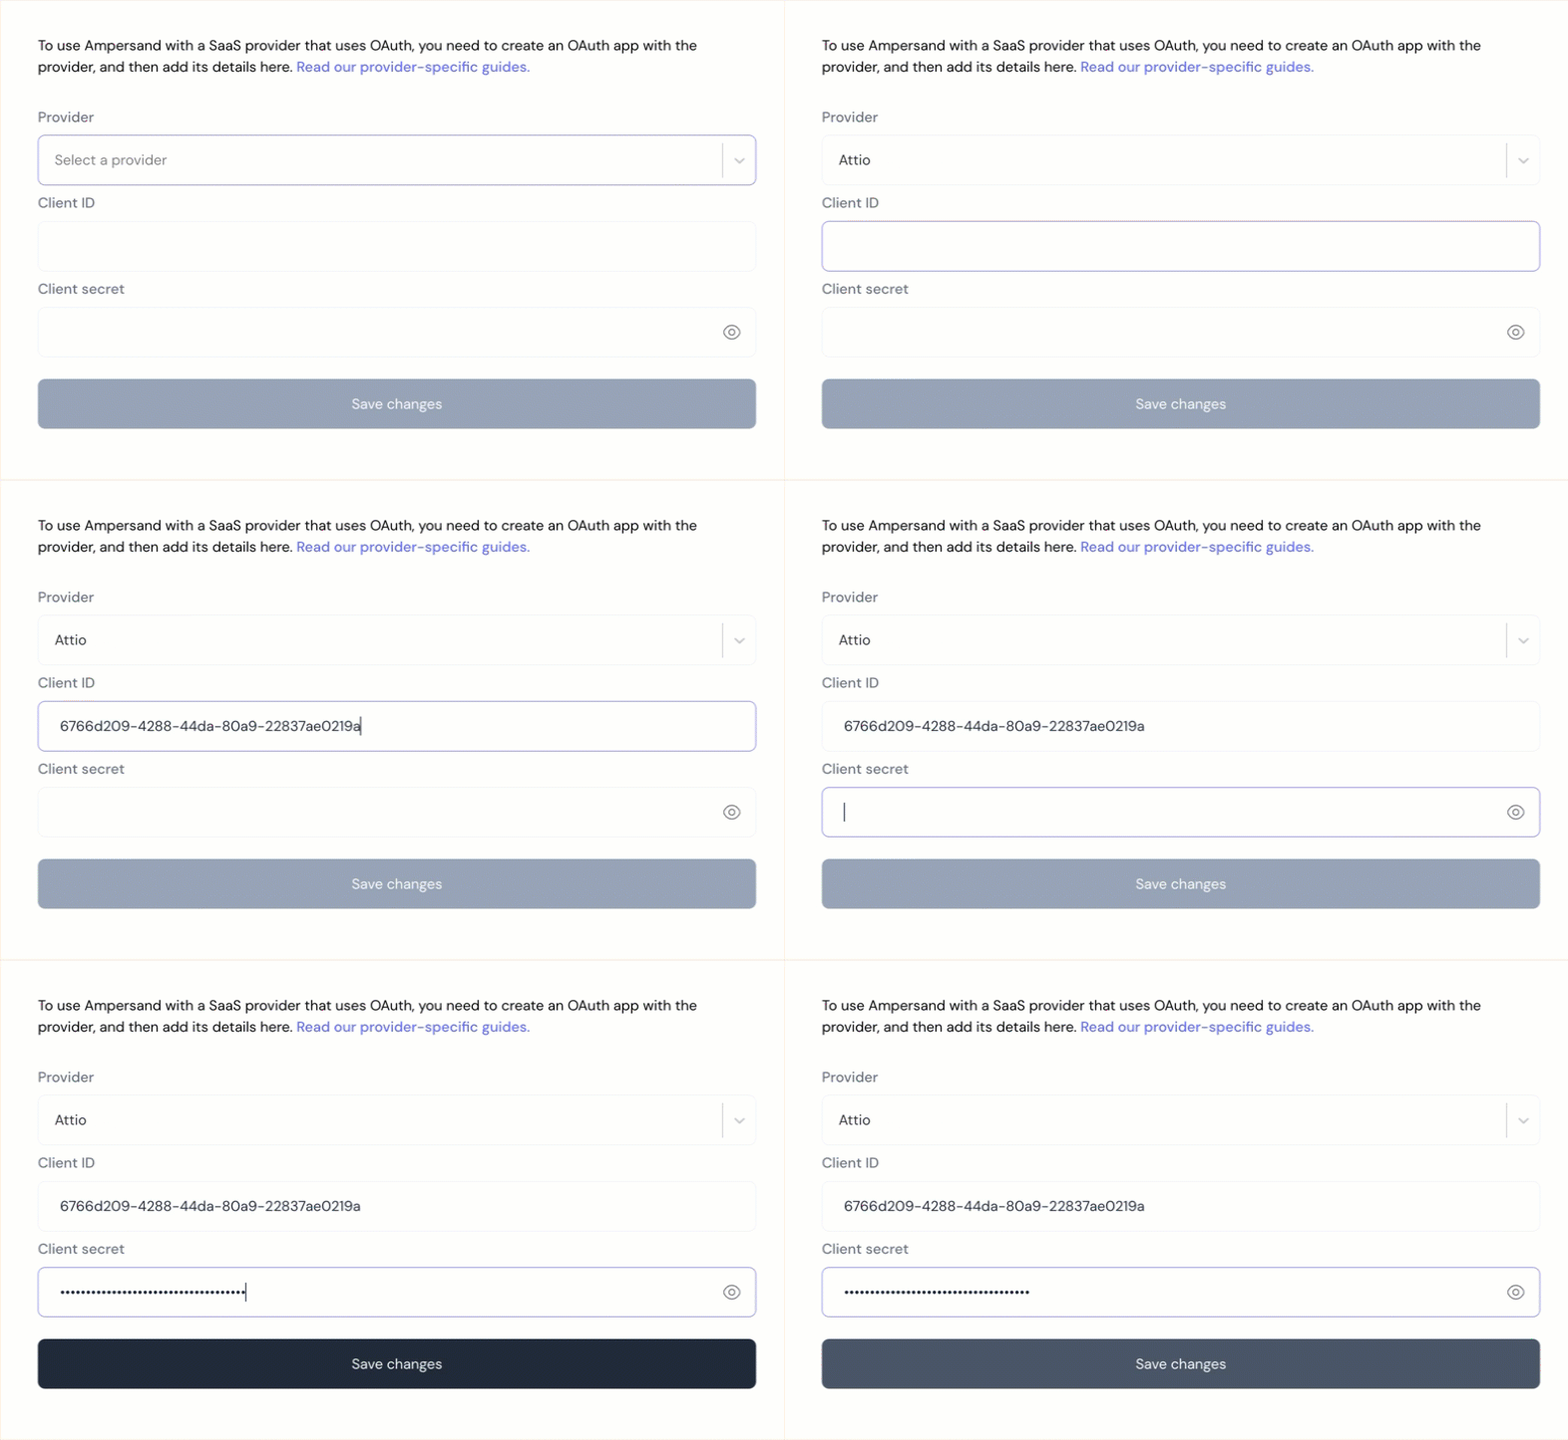
   <img src="https://mintcdn.com/ampersand-24eb5c1a/p4alBfPjHeNuBPh1/images/provider-guides/07458e9-attio2.gif?s=56f1063127d9e19caddc31e193b7908c" alt="Ampersand Integration" width="786" height="482" data-path="images/provider-guides/07458e9-attio2.gif" />

6. Click **Save Changes**.

## Using the connector

To start integrating with Attio:

* Create a manifest file using the [example](https://github.com/amp-labs/samples/blob/main/attio/amp.yaml).
* Deploy it using the [amp CLI](/cli/overview).
* If you are using Read Actions or Subscribe Actions, create a [destination](/destinations).
* Embed the [InstallIntegration](/embeddable-ui-components#install-integration) UI component.
* Start using the connector!
  * If your integration has [Read Actions](/read-actions) or [Subscribe Actions](/subscribe-actions), you'll start getting webhook messages.
  * If your integration has [Write Actions](/write-actions), you can start making API calls to our Write API.
  * If your integration has [Proxy Actions](/proxy-actions), you can start making Proxy API calls.